S-Aframe
Usage
1.
Download related projects:
The related projects can be
downloaded via this download
page.
·
android-core: This is the foundation library that our project is based on.
This Android library project facilitates the support of AmbientTalk capabilities.
·
at2-android: This is the template project where the developers start the
application development.
2.
Import the two projects into eclipse:
This section specifies how to
import the above two projects into eclipse. For those who are familiar with
eclipse, please skip this section.
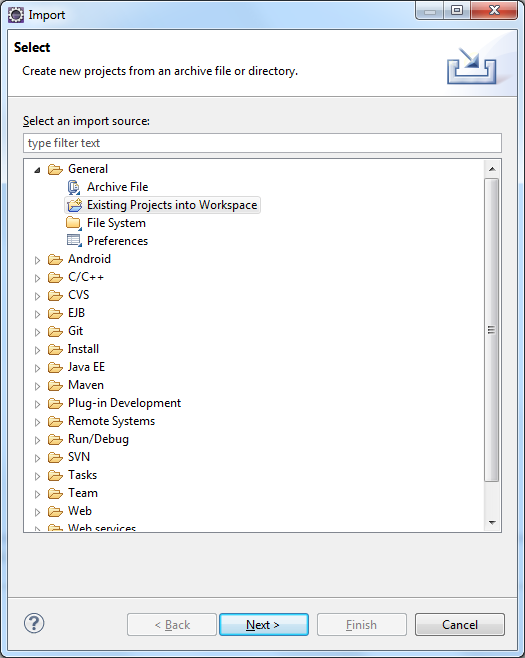
2.1.
In eclipse menu, click File à import…, then in the popup window, select
General à Existing Projects into Workspace, then click
next, shown as follows.
2.2. In the
window “Import
Projects”, select folder where the project “android-core” is saved, then click
OK. Click Finish.
2.3. Import
the project “at2-android”
by similar steps as described above.
2.4. Compile
the workspace by clicking
the Project menu and select Build All, or press the Button Ctro-B in the
keyboard. There should not be any failure reported. The build result is shown
as follows:

3.
Mobile agent development:
This section explains how to use
our mobile AFrame to develop a mobile agent.
The template project “at2-android”
is a start point for the mobile application development. You can change the
project configurations, UI and source code according to your requirement.
However, the Mobile AFrame libs is ready for use in this project and the
developer can start coding directly with any additional configuration. The
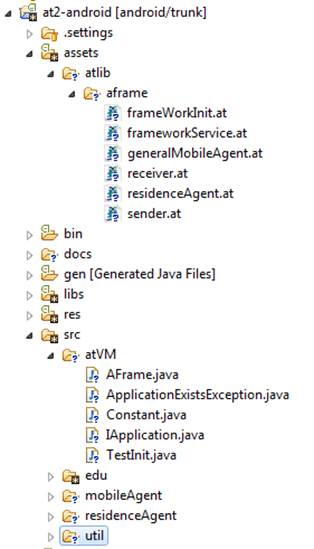
layout of the project is shown as the following figure. Our ambienttalk
foundation library implementation is in the folder assets/atlib/aframe. The
AFrame JAVA class is in the folder src/atVM, src/mobileAgent and
src/residenceAgent.
3.1. Init
the mobile Aframe and residence agent
Use the following code to init a
AFrame:
1 AFrame aFrame1 = new
AFrame(args);
2 ResidenceAgent ra1 = aFrame1.getResidenceAgent();
The source code is self
explained: in line1, an AFrame object “aFrame1” is declared and in line 2 the
corresponding residence agent can be acquired by the getResidenceAgent() method
from the aFrame1 object.
NOTE: globally, one mobile device
is only allowed to declare one AFrame and mobile agent. An error will be
reported if multiple AFrame is declared.
3.2. Create
a mobile agent:
A mobile agent has to implement
the interface IApplication. The method mobileAgentComeBack() is a callback
function invoked by this mobile when it comes back with the mobile agent id and
the result data as parameters. A mobile agent can be created and released by
the following code snippets:
//create a mobile agent
1 GeneralMobileAgent ma1 = aFrame1.createMobileAgent();
//show the mobile agent id
2 System.out.println("mobile
agent created: " + ma1.getId());
//set the mobile agent execution
and type:
//the first parameter is the key
of the mobile agent.
//This is specific to what kind
of data to collect when a mobile agent executes at other residence agent.
//The second parameter is the
type of the mobile agent.
//There are three types of mobile
agent:
//type value 1 means mobileAgent
invoking framework service
//type value 2 means mobileAgent
invoking application specific service
//type value 3 means mobileAgent
get data file meta-data
3
ma1.getApplicationSpecificMobileAgent("time", "1");
//set the owner (the residence
agent which releases the mobile agent) of the mobile agent
4 ma1.setOwner(ra1.getResidenceAgentName());
//set the name of the mobile
agent
5 String appName =
"test";
6 ma1.setAppName(appName);
//registration of the mobile
agent to residence agent.
7 ra1.register(appName, new
TestInit());
//set the delay that how lang the
mobile agent sleep before going to the next residence agent
8 ma1.setDelay(5000);
//how mobile agent transition in
the network, the possible values are: allNodes, oneStep (mobile agent transits
to the next residence agent and stops there), subset (mobile agent transits to
a subset of the network).
9
ma1.setTransitionMode("allNodes");
//Set the transition subset. The
lines of 10 and 11 are dummy since the transition mode is allNodes.
10 Collection<String> set =
new ArrayList<String>();
11 ma1.setTransitionSet(set);
//execute mobile agent at the
current residence agent
12 ma1.execute();
//transits the mobile agent to
the next node. The first parameter is used to tell mobile agent to clean the
data if left. The second parameter is used to tell mobile agent to take the execution
data away.
13 ma1.transitToNextNode(true,
true);
A sample implementation of mobile
agent can be found at the folder src/atVM/testInit.java
4. Development of application
specific service
This section explain the
development of the application specific service.
4.1. JAVA
Implementation of application specific service.
The development of application
specific application is any class that implement the interface: residenceAgent.
IApplicationService
The interface is declared as
follows:
/**
* execute method, this method can be invoked
by the mobile agent when it
* comes to one node.
*
* @return the result of the service execution,
when this returned to the
*
mobile agent, it can decide whether to take it away or leave it
*
at the node.
*/
public
String executeService();
public
int getDelay();
The explanation in the source
code is straightforward thus we omit the further explanation. Two examples can
be found at: src/residenceAgent/applicationService/demoIPAddressService and
PictureService.
4.2
Registration of the application specific service to residence agent
If the application specific
service implementation class is
residenceAgent.applicationService.demo.IPAddressService, then:
1 Open the file:
assets/atlib/aframe/frameWorkInit.at
2 Add two lines as follows:
#1 def ipAddressService :=
jlobby.residenceAgent.applicationService.demo.IPAddressService.new();
#2
residenceAgent.addApplicationService("ipAddressService",
ipAddressService);
In line #1, an ipAddressService
is declared with the java class. The java class has the syntax of
jlobby.class.package.name format. Then in line #2, the service is registerd to
the residenceAgent for the invocation of mobile agent. The first parameter is
the key, which is used by the mobile agent for invocation and the second
parameter is the service declared in the previous line.
Mobile
SOA Framework Usage
Apart from Aframe framework, the
current version of the mobile SOA framework is composed with two Maven based
Android Projects: i-jetty-ui and webapp. Both the projects are based on the
open source implementation mobile service application implementation from the
i-jetty community.
1. Install the mobile soa server environment on your mobile device, which is
implemented by the project i-jetty-ui.
The location of the complied release for the Android platform is here.
2. Implement the rest web service class.
In eclipse, import the project webapp. The work of the rest service
implementation class should be done in this project. We adopt the resource
oriented rest service design principle: the method information is presented as
HTTP method (GET, POST , PUT , DELETE methods represent CRUD data operation
respectively). Based on this principle, we propose a few design constraints
that the developers need to follow. We will specify these constraints later.
As an example, a server side GPS information rest service implementation
to provide GPS information of the server using HTTP GET method can be
implemented in the following way:
(1)
Declare the service implementation class:
public class GPSService {
//...
}
As what you have seen, the
service implementation class can be just as a POJO. You don't need to be
subclass of other classes or implemente a specific interface.
(2)
Declare the service implementation method inside the implementation class:
public String getGPSInfo(String
requestURL, ServletConfig config) {
//...
}
NOTE: We require the service
method declaration has two parameters: requestURl and config of types: String
and ServletConfig. The requestURL is the information of the request URL of the
client. The config contains handlers for the access of Android API and i-jetty
mobile server APIs. Both the information will be useful in the implementation
of the mobile rest service.
(3)
Mobile rest service implementation
Although a specific GPS service
implementation can be the following. Actually any service implementation
supported by Android API and i-jetty mobile server API can be developed and
deployed.
Context androidContext =
(Context) config.getServletContext()
.getAttribute("org.mortbay.ijetty.context");
LocationManager mgr = (LocationManager) androidContext
.getSystemService(Context.LOCATION_SERVICE);
Criteria criteria = new Criteria();
String best = mgr.getBestProvider(criteria, true);
String result = best;
Location location = mgr.getLastKnownLocation(best);
if (location == null) {
result += "\nLocation[unknown]";
} else {
result += "\n" + location.toString();
}
return result;
3. Edit the mapping configuration
file. This file is located at the position services.conf. This file maps a combination of the HTTP
request METHOD and the request url to the rest web service implementation class
and the web service implementation method. The format of each line of the
configuration file is:
requestURL,HTTP Method,service
Impelmentation Class Name,Service Implementation Method Name. An example of the
configuration is presented below.
/console/services/GPSService,GET,org.mortbay.ijetty.console.GPSService,getGPSInfo
The following is the constraints
of the rest service class implementation and the format of the configuration
files.
Constraints:
·
For each line of the configuration file, the format has to be: url,HTTPMethod,JAVAClass,Operation.
Separated with only one comma and without any space or any other characters.
·
The url column has to be started with /console/services/*, for example:
/console/services/test
·
The type of returning value has to be String. The whole string will be
returned as the HTTP body of the response message.
·
The parameters of the rest service implementation methods have to be
String for HTTP Method POST, PUT, and DELETE. This string is the HTTP body of
the request message.
·
There should be no parameter for the rest service implementation method
for HTTP Method GET, because the HTTP GET request message has no body at all.
However, the url information can be used as parameters, as suggested by the
design principle of resource orientation.
4. Compile: Compile the project use
maven. The compiled web service archive is available at console.war with all the examples in it.
5. Deploy the service archive to the
platform: in the mobile device, launch the previously installed mobile soa
server environment, then deploy the web service archive. The deployment method
is the same as a normal web archive deployment on the i-jetty server.
(4) A
client side example
A specific client for the
invocation of the GPS service may be the following.
try {
myurl = new
URL("http://192.168.1.19:8080/console/services/GPSService");
URLConnection uc = myurl.openConnection();
byte[] buf = new byte[2048];
BufferedInputStream in = new BufferedInputStream(
uc.getInputStream());
StringBuffer sb = new StringBuffer();
int c;
while ((c = in.read(buf)) != -1) {
sb.append(new String(buf, 0, c));
}
System.out.println(sb.toString());
} catch (MalformedURLException e) {
// TODO Auto-generated catch block
e.printStackTrace();
} catch (IOException e) {
// TODO Auto-generated catch block
e.printStackTrace();
}
As you can see, the client
initiates the HTTP request to the specific URL to using HTTP Get Method to get
the result and print it out to the standard output.